5 Simple Ways How to Plant Asparagus Crowns
The smell of damp, oxygenated earth signifies a soil profile ready for the long-term investment of perennial vegetables. When you hold a dormant crown, you should feel the heavy turgor pressure in its fleshy storage roots; they should be pliable and cool, not brittle or desiccated. Learning how to plant asparagus crowns requires a commitment to soil physics and long-term nutrient cycling. This is not a seasonal crop but a twenty-year biological installation that demands precision from the first trench.
Asparagus officinalis is a heavy feeder that relies on a robust rhizosphere to sustain its spear production. Success begins with understanding the metabolic requirements of the crown, which functions as a nutrient battery. By the time the first spears emerge, the plant is drawing almost exclusively on the carbohydrates stored in the roots from the previous season. If the initial planting is flawed, the plant will suffer from chronic low vigor, leading to spindly spears and premature senescence. Precision in depth, spacing, and soil chemistry during the establishment phase determines whether your stand thrives or succumbs to crown rot within three seasons.
Materials:

The substrate must be a friable loam with a high Cation Exchange Capacity (CEC) to ensure mineral availability. Asparagus is sensitive to acidic conditions; you must maintain a soil pH between 6.5 and 7.0. If your soil tests below 6.0, incorporate pelletized lime at a rate determined by your local extension office to prevent aluminum toxicity and phosphorus fixation.
For the initial planting, prioritize an NPK ratio of 5-10-10. The high phosphorus content is critical for ATP production and root elongation. Avoid high-nitrogen fertilizers during the first phase, as excessive nitrogen can lead to succulent growth that is highly susceptible to fungal pathogens. Incorporate organic matter such as well-rotted compost to achieve a minimum of 5 percent organic matter by volume. This improves the soil structure, allowing for better gas exchange in the root zone.
Timing:
Asparagus crowns should be installed in the early spring, as soon as the soil can be worked and temperatures reach a consistent 45 to 50 degrees Fahrenheit. In Hardiness Zones 3 through 8, this usually falls between March and May. The goal is to get the roots established before the summer heat triggers rapid transpiration.
The biological clock of the asparagus crown is governed by soil temperature. Once the soil hits 50 degrees Fahrenheit, the crown breaks dormancy and begins the transition from the vegetative storage stage to the reproductive spear-pushing stage. Planting too late in the season forces the plant to compete with high evaporation rates before the root system can effectively utilize capillary water. If you are in a southern zone, late autumn planting is possible, but spring remains the gold standard for maximizing the first year of fern growth.
Phases:

Sowing and Trenching
Excavate a trench 12 inches wide and 8 to 10 inches deep. Space your trenches 3 to 4 feet apart to allow for the massive mature fern canopy. Create a small mound of soil at the bottom of the trench, roughly 2 inches high, every 12 to 18 inches. This provides a pedestal for the crown to sit on, allowing the roots to drape downward at a 45-degree angle.
Pro-Tip: Proper root orientation prevents auxin suppression issues. By spreading the roots radially, you maximize the surface area for mycorrhizal symbiosis, which enhances the uptake of immobile nutrients like phosphorus.
Transplanting the Crowns
Place the crown atop the mound with the buds (the "eyes") pointing upward. Cover the crowns with 2 to 3 inches of soil. Do not fill the trench to the top immediately. As the spears begin to emerge and grow, you will gradually backfill the trench over the course of the first summer. This method ensures the crown is deep enough to stay cool in summer and insulated in winter, while not being smothered by too much soil weight during its initial push.
Pro-Tip: Gradual backfilling utilizes phototropism to guide spear direction. It also smothers emerging weeds at the base of the plant without the need for mechanical cultivation that could damage the shallow feeder roots.
Establishing the Stand
Once the spears reach 6 inches in height, add another 2 inches of soil to the trench. Repeat this until the trench is level with the surrounding grade. During this phase, the plant is focusing on "ferning out." The tall, feathery foliage is the plant's solar panel; it must remain intact until it turns brown in late autumn to ensure maximum carbohydrate translocation back to the crown.
Pro-Tip: Maintaining high turgor pressure during the first year is vital. If the ferns wilt, the plant enters a stress state that halts root expansion, significantly reducing the following year's yield.
The Clinic:
Symptom: Spears are thin, spindly, and less than 1/4 inch in diameter.
Solution: This is often a sign of "over-harvesting" or poor crown age. If the stand is young, stop harvesting immediately to allow the plant to rebuild its carbon stores.
Symptom: Yellowing of the fern needles starting from the bottom up (Nitrogen chlorosis).
Solution: Apply a side-dressing of blood meal or a 10-10-10 fertilizer at a rate of 1 pound per 100 square feet. Ensure the fertilizer is watered in to the rhizosphere immediately.
Symptom: Spears are "hooking" or bending sharply as they emerge.
Solution: Check for physical obstructions in the soil or wind damage. If the spear is nicked by a hori-hori knife during harvest, the damaged side stops growing while the healthy side continues, causing the hook.
Fix-It: For phosphorus deficiency, which manifests as purple-tinted foliage and stunted roots, use bone meal or triple superphosphate. Apply these directly to the trench at planting, as phosphorus does not move easily through the soil profile.
Maintenance:
Asparagus requires consistent hydration to maintain cell elongation. Provide 1.5 inches of water per week at the drip line. Use a soil moisture meter to ensure the water is penetrating at least 8 inches deep. Surface watering encourages shallow rooting, which makes the plant vulnerable to drought.
Keep the bed meticulously weeded. Asparagus does not compete well with aggressive grasses. Use a hori-hori knife to slice weeds below the soil surface, being careful not to disturb the asparagus rhizomes. In late winter, use bypass pruners to cut the dead, brown ferns to the ground. Remove this debris from the site to prevent the overwintering of pathogens. Mulch the bed with 3 inches of clean straw or wood chips to suppress weeds and regulate soil temperature.
The Yield:
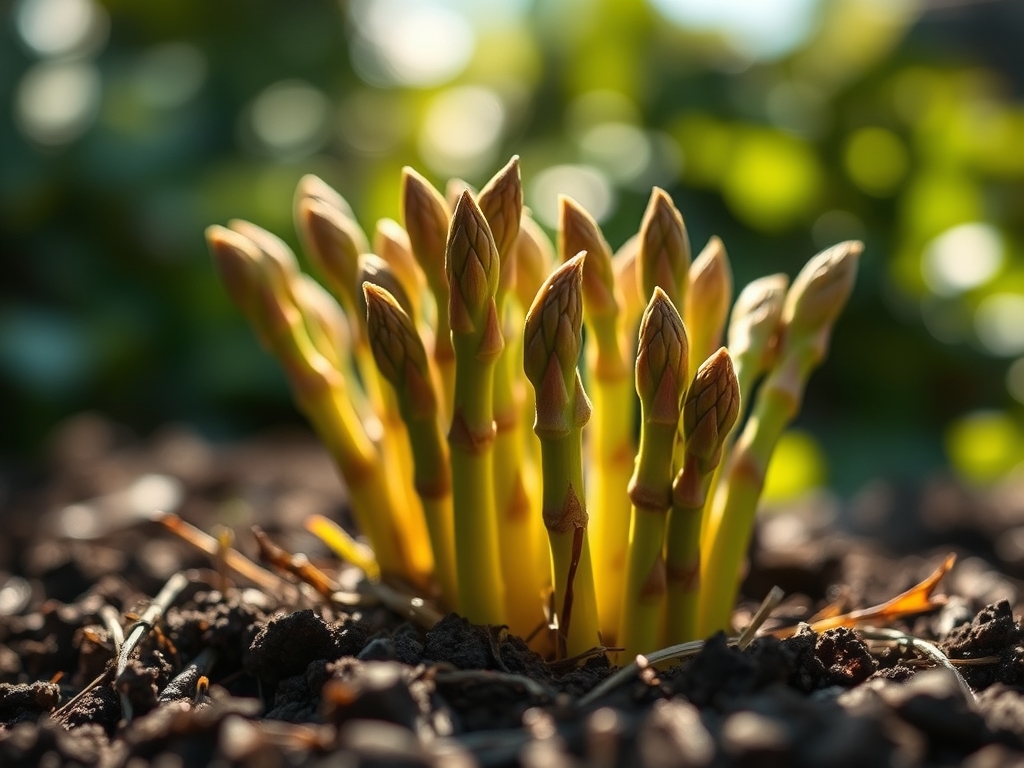
Do not harvest any spears during the first year of planting. In the second year, you may harvest for two weeks. By the third year, the stand is established enough for a full six to eight-week harvest. Use a sharp knife to cut spears at or just below the soil surface when they are 6 to 10 inches tall and the tips are still tight.
To maintain "day-one" freshness, stand the harvested spears upright in a container with one inch of cold water. Place them in a refrigerator set to 34 to 36 degrees Fahrenheit. This slows the metabolic rate and prevents the sugars from converting into lignin, which causes the spears to become woody and tough.
FAQ:
How deep should I plant asparagus crowns?
Plant crowns 8 to 10 inches deep in a wide trench. Initially cover with 2 inches of soil, then gradually fill the trench as the spears grow to ensure deep root establishment and insulation.
Can I plant asparagus in heavy clay soil?
Yes, but you must incorporate significant organic matter to improve drainage. Use a raised bed if the site has standing water, as asparagus crowns will rot in anaerobic, waterlogged conditions.
How many crowns should I plant per person?
For a consistent seasonal harvest, plant 10 to 20 crowns per person. This provides enough volume for multiple meals per week during the peak six-week harvest window in late spring.
When is the best time to fertilize established asparagus?
Fertilize in early spring before spears emerge and again immediately after the final harvest. This second application fuels the fern growth necessary for storing energy in the crown for next year.